GETTING STARTED

SECTION 1

CREATING USER ACCOUNTS

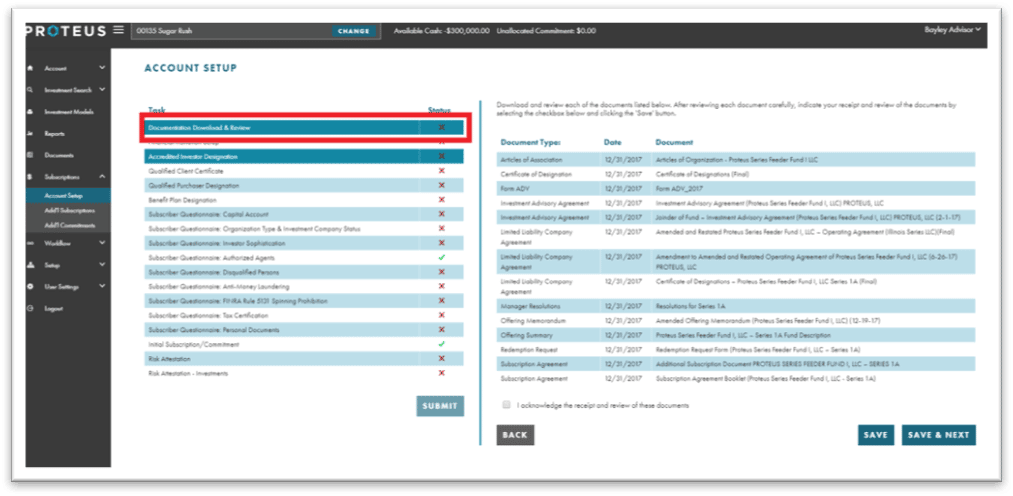
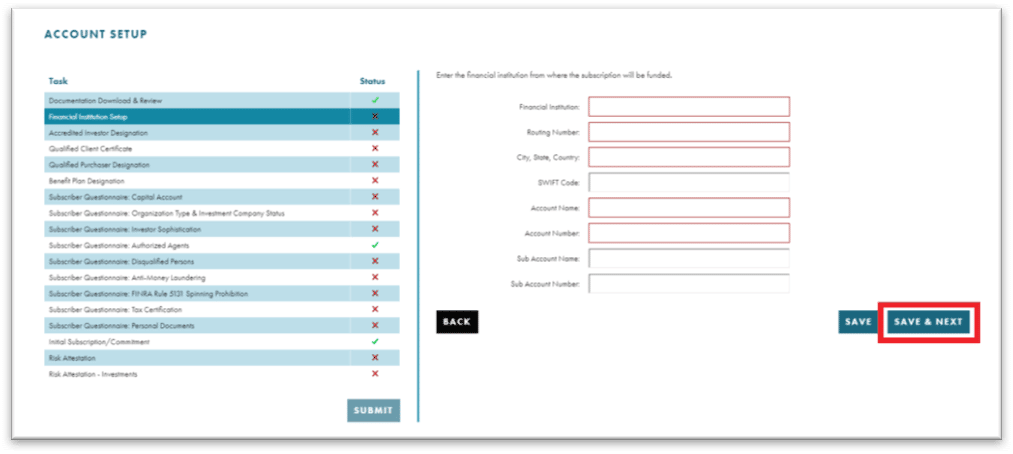
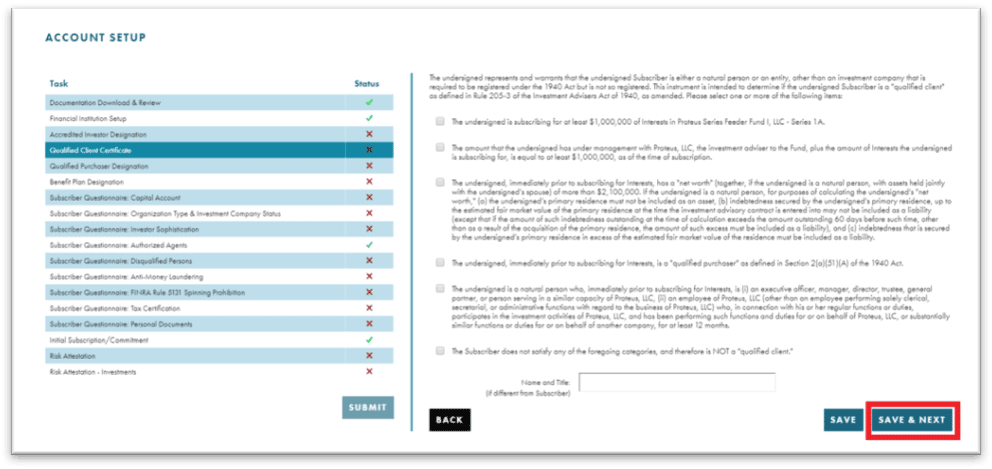
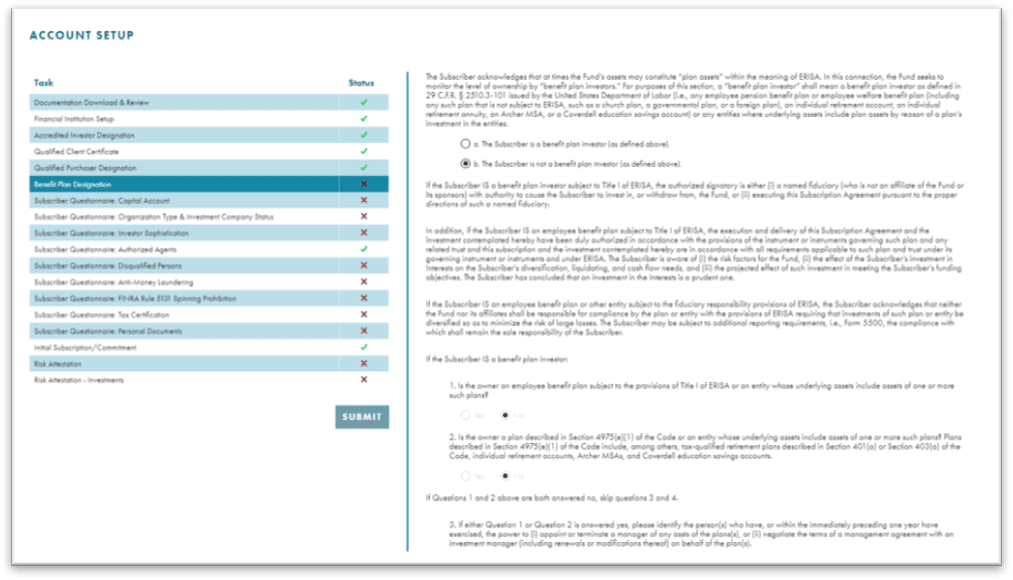
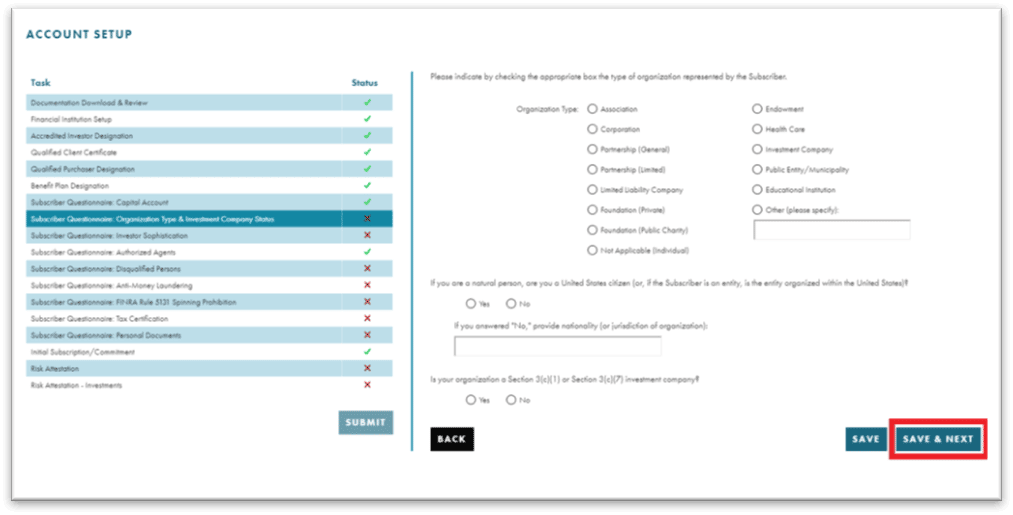
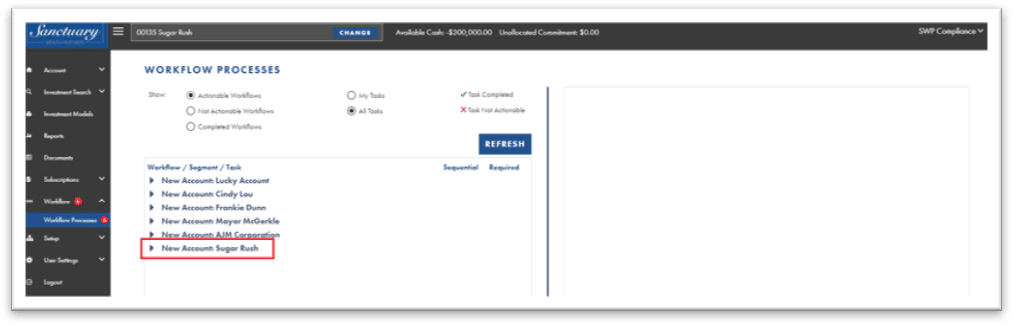
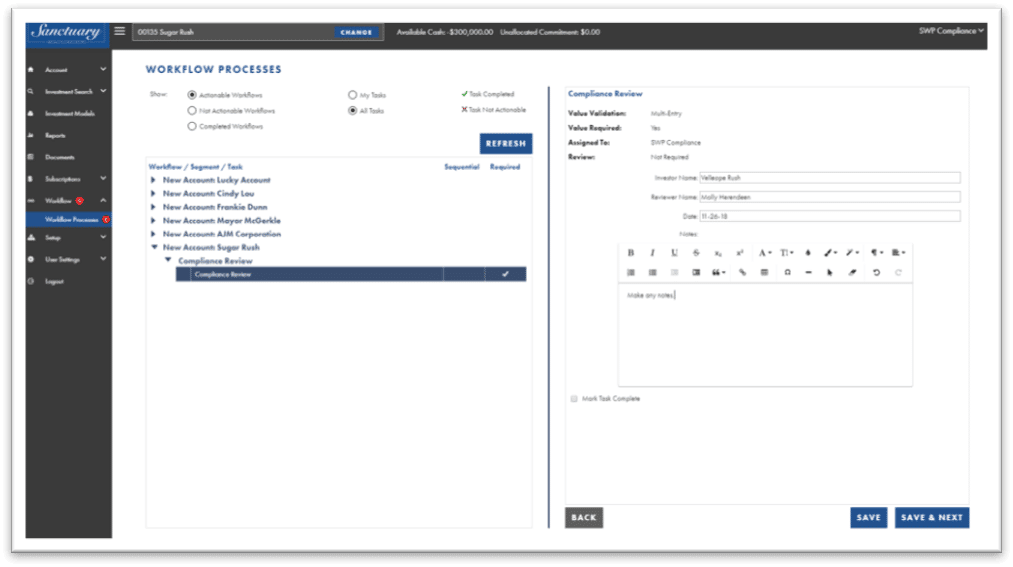
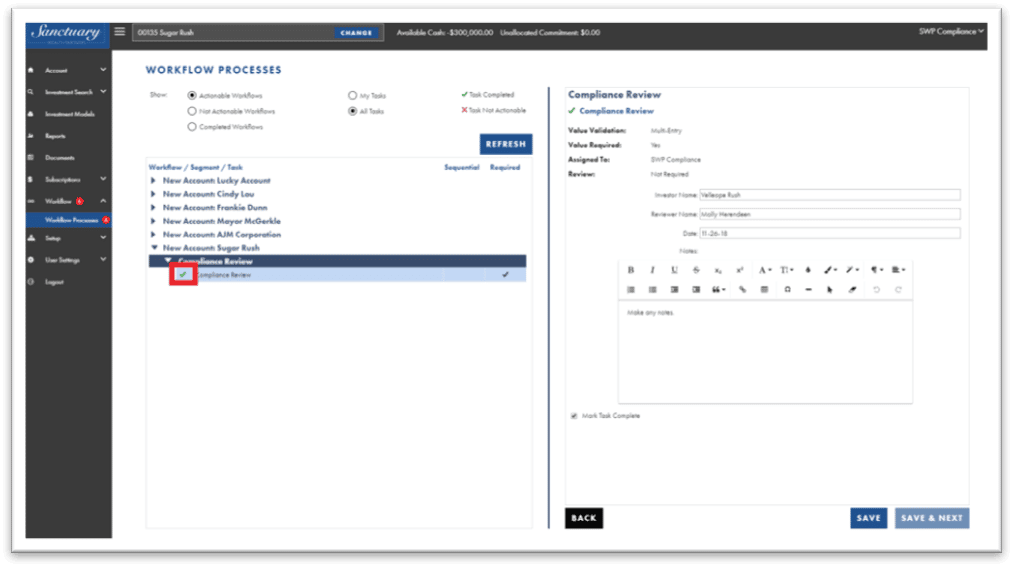
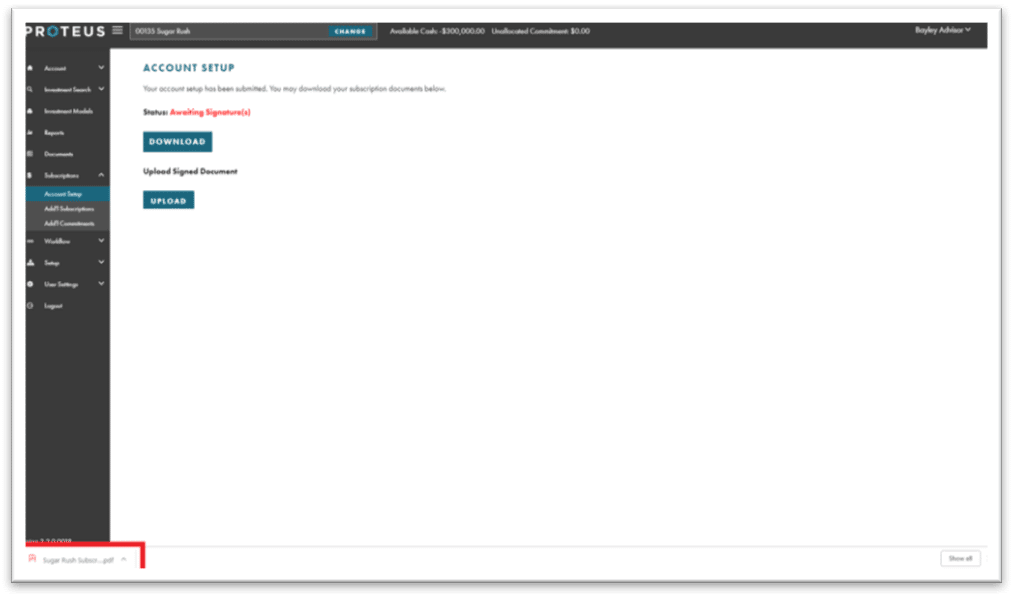
All new accounts will be subject to investor due diligence in order to satisfy Proteus AML, KYC and Accreditation requirements. Each task within the Initial Setup & Subscription must be completed and approved prior to accessing the platform and making investment decisions. Prior to account funding or committing, Proteus will notify the investor upon completion of the account verification.

1.1: CREATE NEW ACCOUNT (NEW USER)

Return to Menu

Step 1: Log in to the Proteus Platform

Visit https://platform.proteuscapital.us/ or use your organization’s custom URL and enter your user credentials to log in as an advisor or CSA. 

Return to Menu

Step 2: Go to Setup, then click “Advisor Group” 

Navigate to “Setup” within the left navigation pane, then select “Advisor Group” from the dropdown menu

Return to Menu

Step 3: Select the appropriate advisor group from the list.

Return to Menu

Step 4: Select “ADD” to add new account

Return to Menu

Step 5: Enter the information on the Add Account Basics tab. Click Account Details.

Return to Menu

Step 6: Complete the information on the Account Details tab. Click Investments. 

Return to Menu

Step 7: Select Allocation Method.*

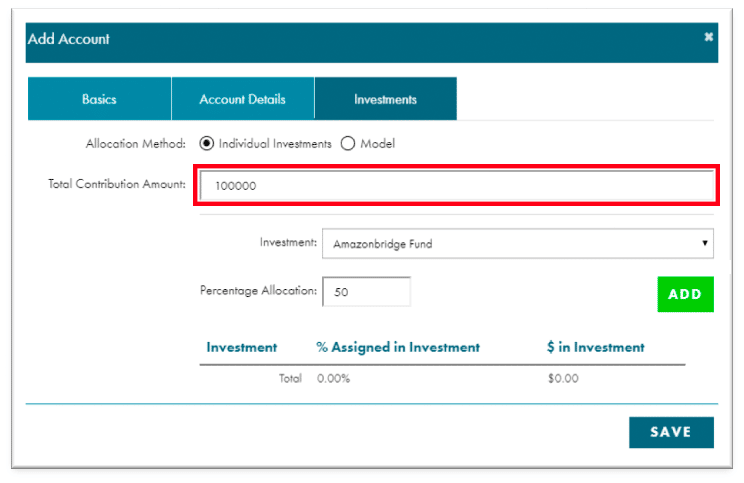
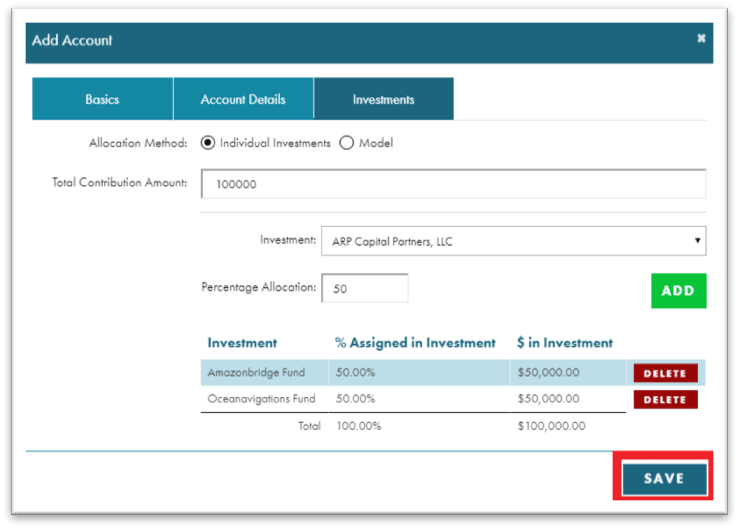
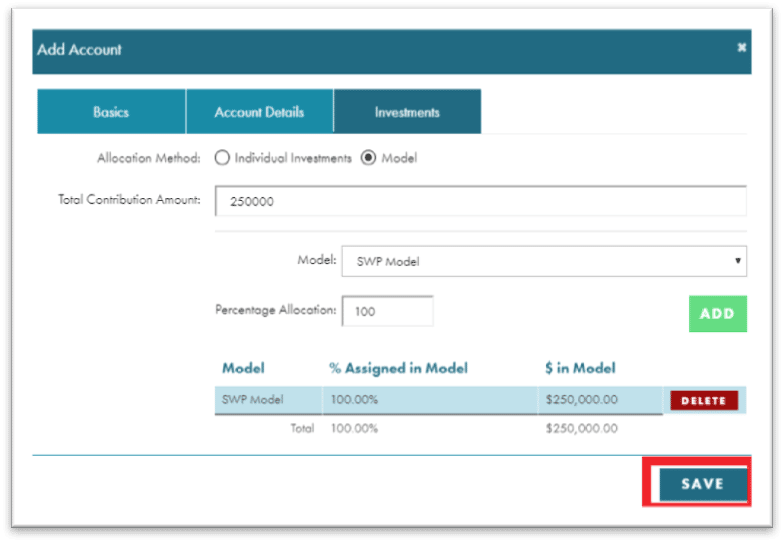
*There are two possible options for allocating your contribution to different investments. To continue to allocate to individual investments, go to Step 8. If using a model to invest, refer to the “Invest Using a Model” section.

Return to Menu

Step 8: Enter the total contribution amount. 

Return to Menu

Step 9: Select investments and allocate funds*

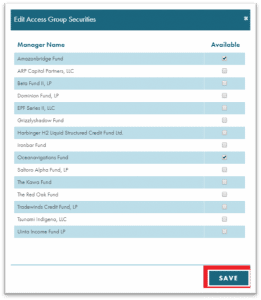
*Select one or more investments by choosing the investment from the drop-down list. Enter the percentage allocation for this investment and click “ADD.” Click “SAVE” when finished. 

Return to Menu

Step 10: Finalize investments and save entries*

*Continue adding investments as needed.  When complete, click “SAVE.” 
 Note: The percentage allocated does not have to equal 100%.  Anything less than 100% will show the non-allocated funds as cash. 

Return to Menu

Step 11: The account has been created and will be shown in the Accounts tab.

Return to Menu

1.2: GRANT INVESTMENT ACCESS (USER ACCOUNTS)*

*Note: The following steps are a continuation from the previous module: 1. Create New Account (New User)

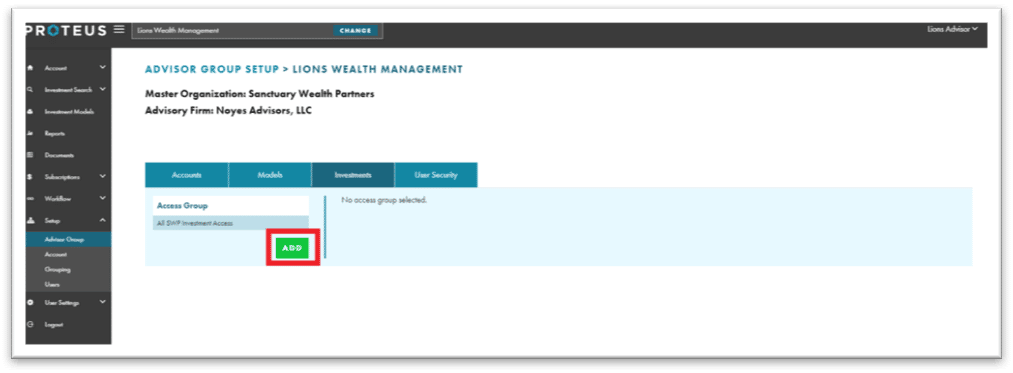
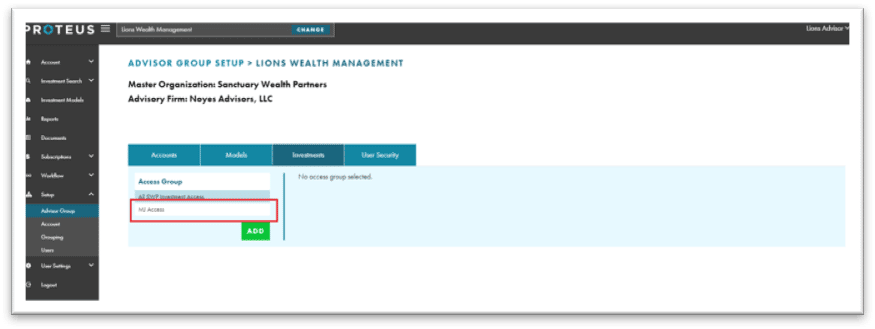
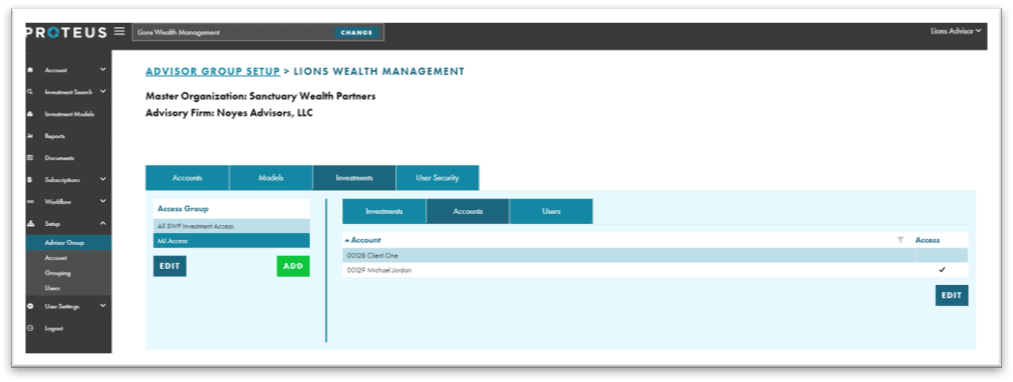
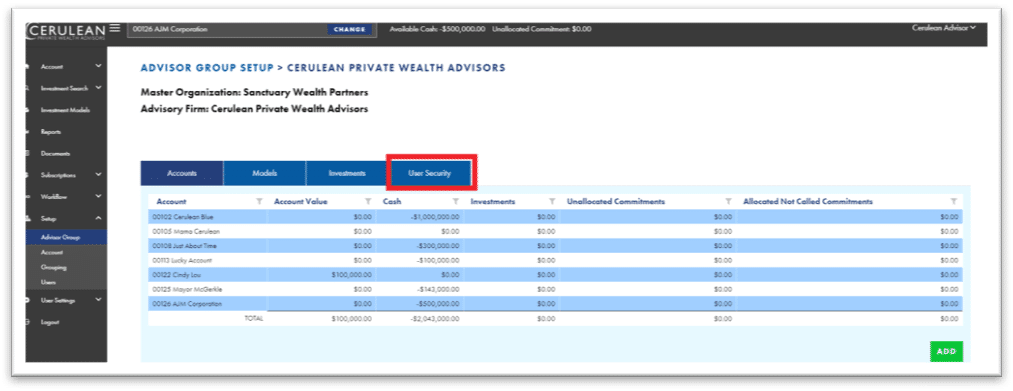
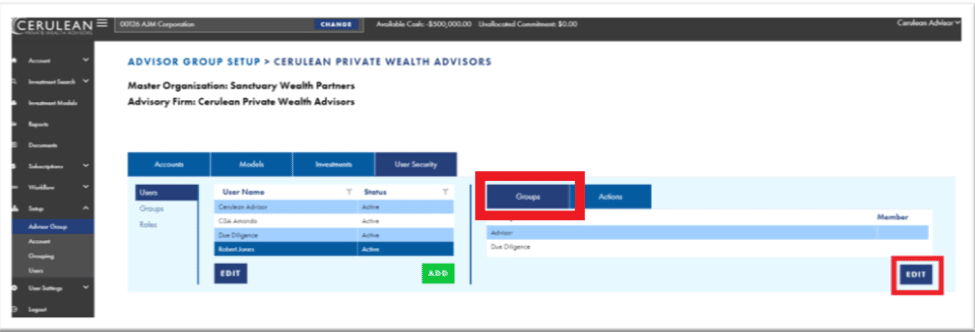
After a new account has been created, the next step is to give investment access to this account.  Without this, the investor tied to the account will not see any options in the investment search.   


Return to Menu

Step 1: Select the Investments tab

Navigate to “Setup,” and then click on “Advisor Group.” Select the existing advisor group and then click on the “Investments” tab. 

Return to Menu

Step 2: Create a new Investment Access Group*

*To create a new Investment Access Group, click the “ADD” button. If the correct group already exists, continue to Step 7

Return to Menu

Step 3: Enter the new Access Group Name. Click “SAVE” when finished.

Return to Menu

Step 4: The new Access Group was created and can be seen in the list.

Return to Menu

Step 5: Select the Access Group to assign investments. Click “EDIT” to select investment access.

Return to Menu

Step 6: Select the appropriate funds and click SAVE. 

Return to Menu

Step 7: Associate the new account with the Investment access group. Then, select the “Accounts” tab.

Return to Menu

Step 8: Click “EDIT”

Return to Menu

Step 9: Choose the correct account(s) and click “SAVE.”

Return to Menu

Step 10: The account has now been created and assigned investment access.  The investor now has a new user account created as well. 

Return to Menu

1.3: CREATE NEW ACCOUNT (EXISTING USER)

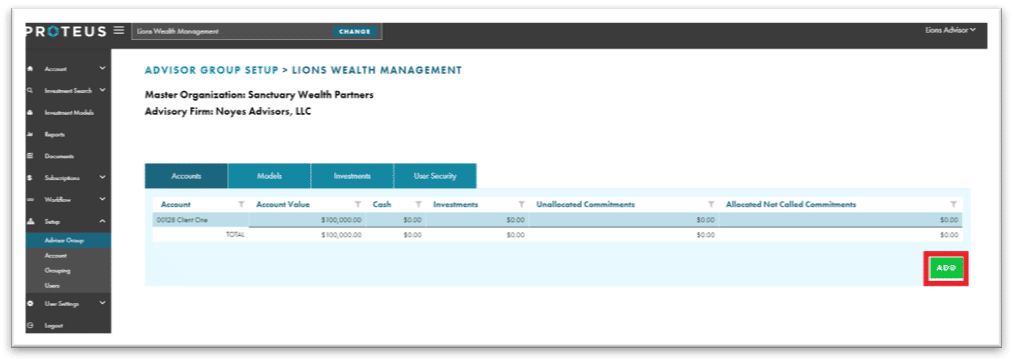
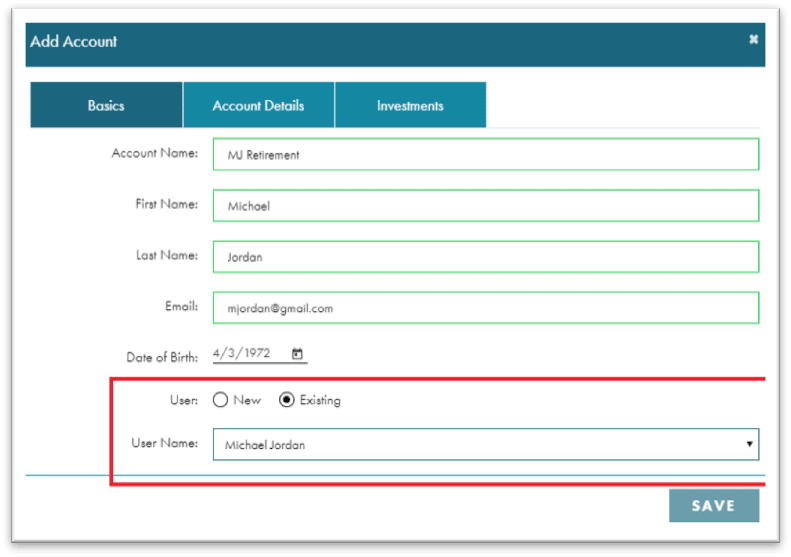
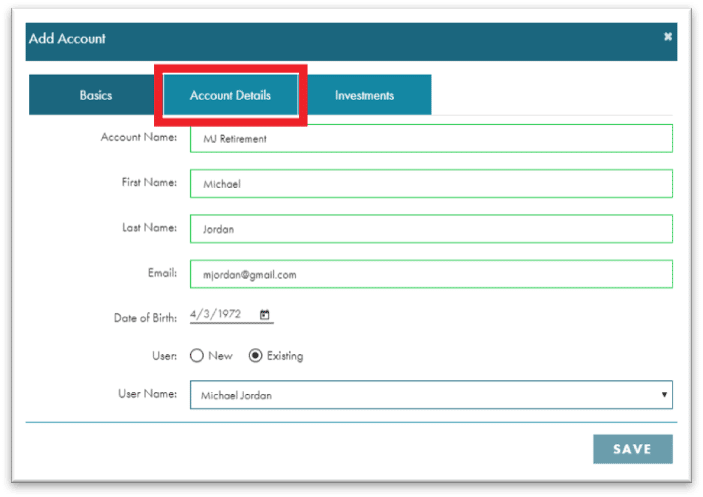
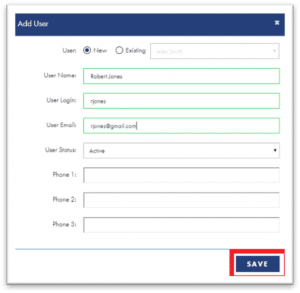
This section will help you create a new account from an existing user account. If you need to create a new account under a new user, please refer to: 1. Create New Account (New User)

Return to Menu


Step 1: Login as an advisor or CSA.

Visit https://platform.proteuscapital.us/ or use your organization’s custom URL and enter your user credentials to log in as an advisor or CSA. 

Return to Menu

Step 2: Navigate to “Setup,” and then click on “Advisor Group.” 

Return to Menu

Step 3: Select the appropriate advisor group from the list.

Return to Menu

Step 4: Select “ADD” to add a new account.

Return to Menu

Step 5: Enter account name, first name, last name, email and date of birth.

Visit https://platform.proteuscapital.us/ or use your organization’s custom URL and enter your user credentials to log in as an advisor or CSA. 

Return to Menu

Step 6: Select Existing under User and choose the correct user from the User Name drop-down list.

Navigate to “Setup” within the left navigation pane, then select “Advisor Group” from the dropdown menu

Return to Menu

Step 7: Click “SAVE” when finished to proceed. 

Return to Menu

Step 8: Click Account Details and continue with Step 6 under 1. Create New Account (New User)

Return to Menu

SECTION 2

THE SUBSCRIPTION PROCESS

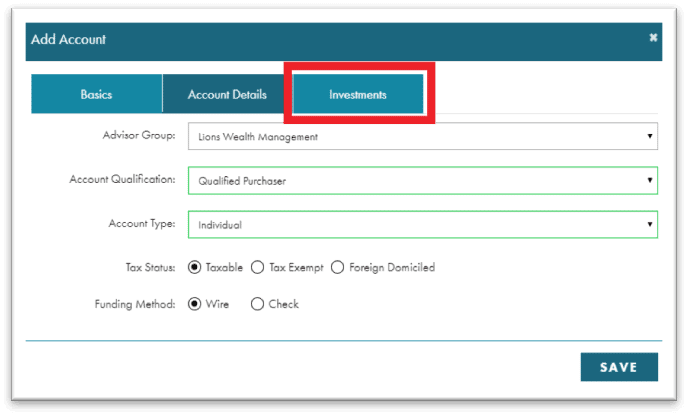
All new investment accounts will need to complete the subscription process in order to fund the account and invest in desired investment options and/or models. The steps below will detail how to complete this process from both the user account and the admin accounts tied to it. 

2.1: CREATE NEW SUBSCRIPTION

Return to Menu

Step 1: Log in as an advisor or CSA.

Visit https://platform.proteuscapital.us/ or use your organization’s custom URL and enter your user credentials to log in as an advisor or CSA. 

Return to Menu

Step 2: View the correct account by selecting “CHANGE.” in the top navigation bar. 

Return to Menu

Step 3: Deselect any previously selected accounts.

Return to Menu

Step 4: Select the correct account and choose “VIEW.”

Return to Menu

Step 5: Select “Subscriptions” and choose “Account Setup.”

Return to Menu

Step 6: The system will walk the user through the information required to populate the subscription document.  

First, review the important documentation on the Proteus Fund.

Return to Menu

Step 7: Place the mouse on the “Articles of Association” document and select.

Return to Menu

Step 8: The document will download for review.

Open the document and review the information before proceeding. 

Return to Menu

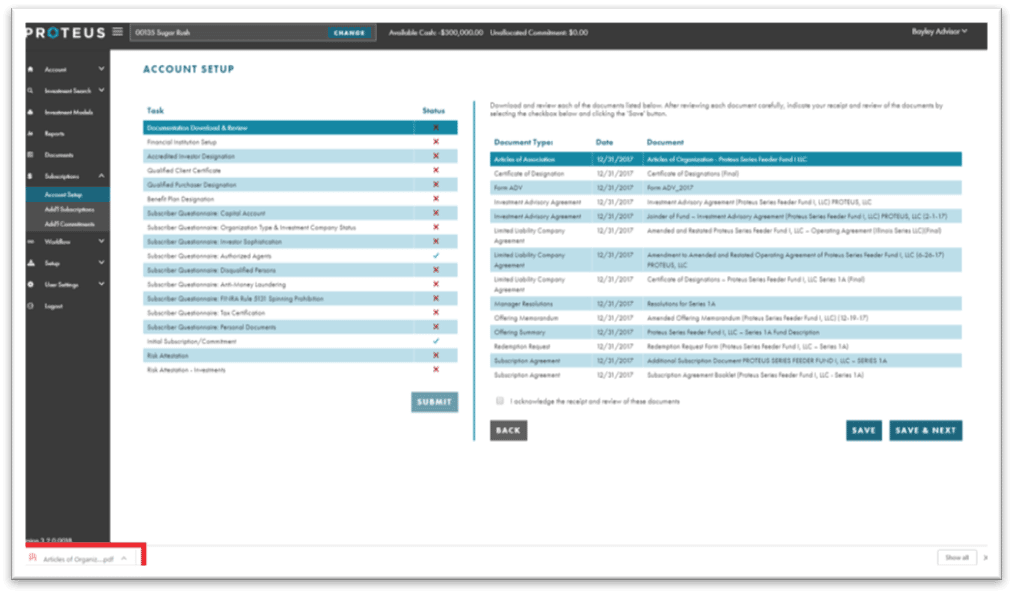
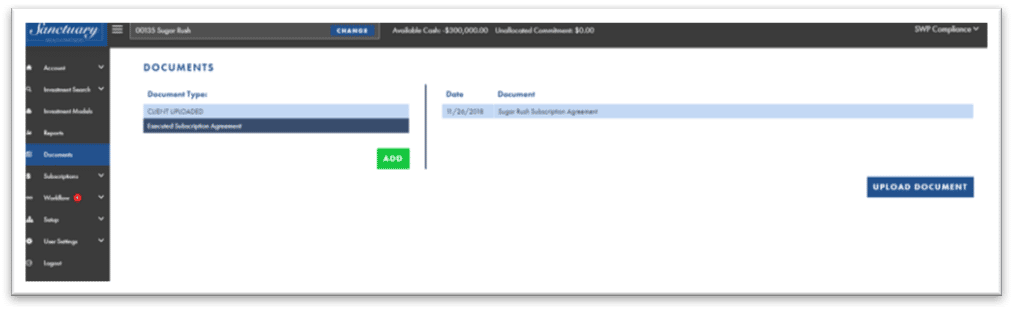
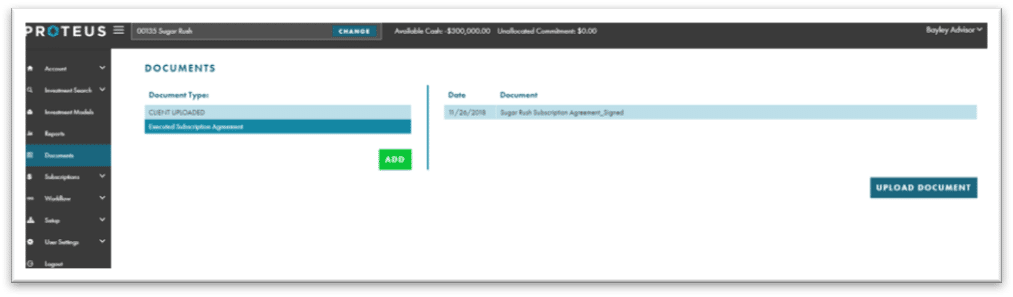
Step 9: Continue reviewing each document in the list.  

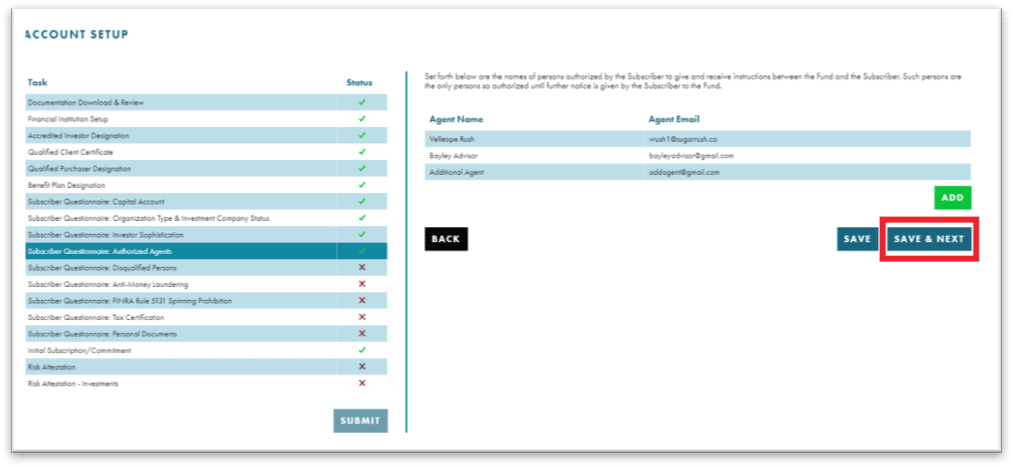
Repeat Step 7 and Step 8 for the remaining documents in the list. Once complete, select the checkbox next to the acknowledgement and choose “SAVE & NEXT.”

Return to Menu

Step 10: Enter the financial information for funding of the account. Click “SAVE & NEXT.”*

*Reminder: Fields outlined in red in Proteus are required.

Return to Menu

Step 11: Review and select the appropriate statements for designating an accredited investor. Click “SAVE & NEXT.”

Return to Menu

Step 12: Review and select the appropriate qualified client statements if applicable.  Click “SAVE & NEXT.” 

First, review the important documentation on the Proteus Fund.

Return to Menu

Step 13: Review and select the appropriate qualified purchaser statements if applicable. Select “SAVE & NEXT.”

Return to Menu

Step 14: Indicate if subscriber is a benefit plan and complete the required information in applicable.  Select “SAVE & NEXT.”

Return to Menu

Step 15: Enter the required information for the capital account. Select “SAVE & NEXT.”

Return to Menu

Step 16: Enter organization type and investment company status. Select “SAVE & NEXT.”

Return to Menu

Step 17: Enter information on the investor’s sophistication. Select “SAVE & NEXT.”

Return to Menu

Step 18: Review authorized agents and enter additional if necessary. Click “ADD” to add another authorized agent.

Return to Menu

Step 19: Enter the additional authorized agent’s name and email. Click “SAVE.”

Return to Menu

Step 20: Once all authorized agents are listed, click “SAVE & NEXT.

Return to Menu

Step 21: Review the disqualified persons statements and select any if applicable. Click “SAVE & NEXT.”

Return to Menu

Step 22: Enter information for the Anti-Money Laundering verifications. Click “SAVE & NEXT.

Return to Menu

Step 23: Review and select the appropriate investor status statement(s). At least one lettered statement must be selected. Click “SAVE & NEXT.”

Return to Menu

Step 24: Enter the tax information. Click “SAVE & NEXT.”

Return to Menu

Step 25: Upload the required documentation. To upload, click “ADD.”

Return to Menu

Step 26: Click “UPLOAD.”

Return to Menu

Step 27: Navigate to and select the correct document. Click “Open.”

Return to Menu

Step 28: Click “SAVE.”

Return to Menu

Step 29: Repeat until all required documents are loaded. Then click “SAVE & NEXT.”

Return to Menu

Step 30: The initial subscription amount is carried over from account creation. Click “SAVE & NEXT.”

Return to Menu

Step 31: Enter the required information for the Risk Attestation.

Return to Menu

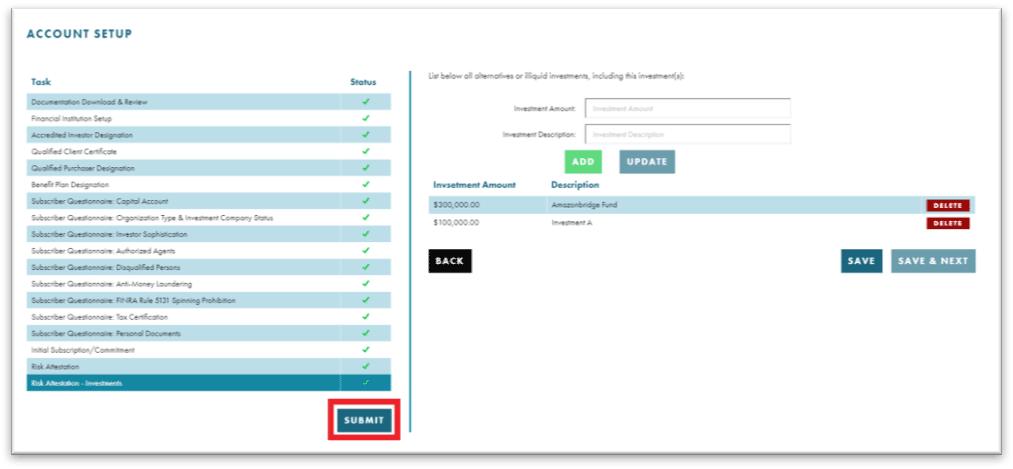
Step 32: Add all alternative or illiquid investments. The current Proteus investment will default. Enter the investment amount and description. Click “ADD.”

Return to Menu

Step 33: Continue this process until all alternative investments are noted. Click “SAVE.”

Return to Menu

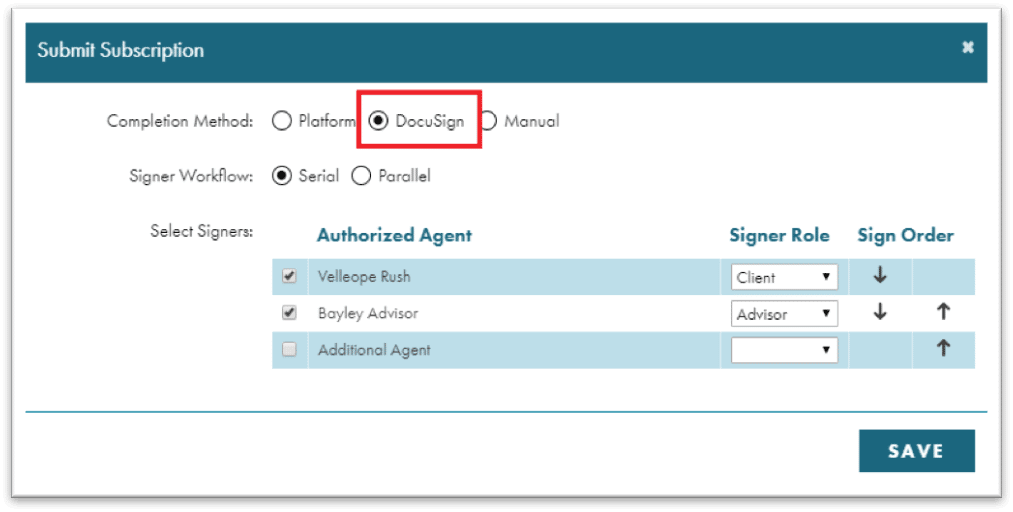
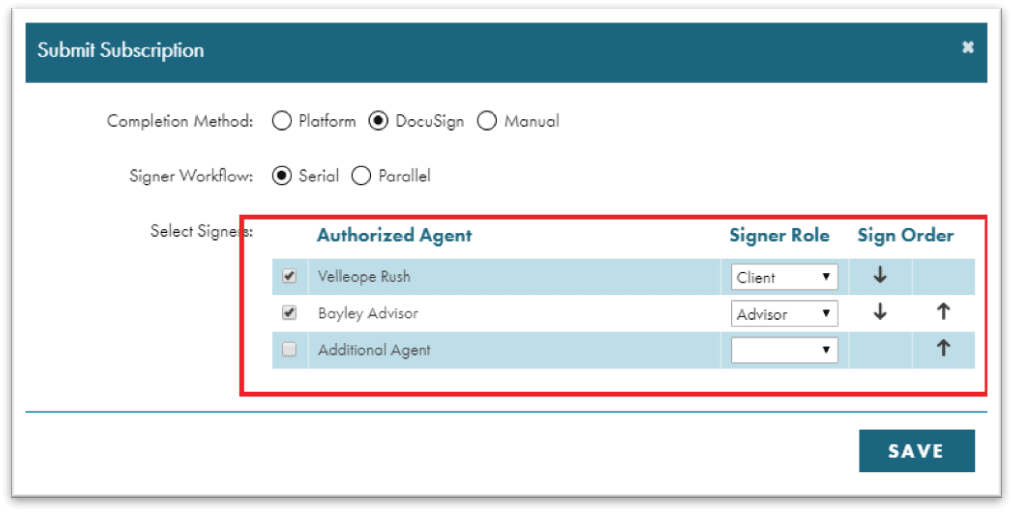
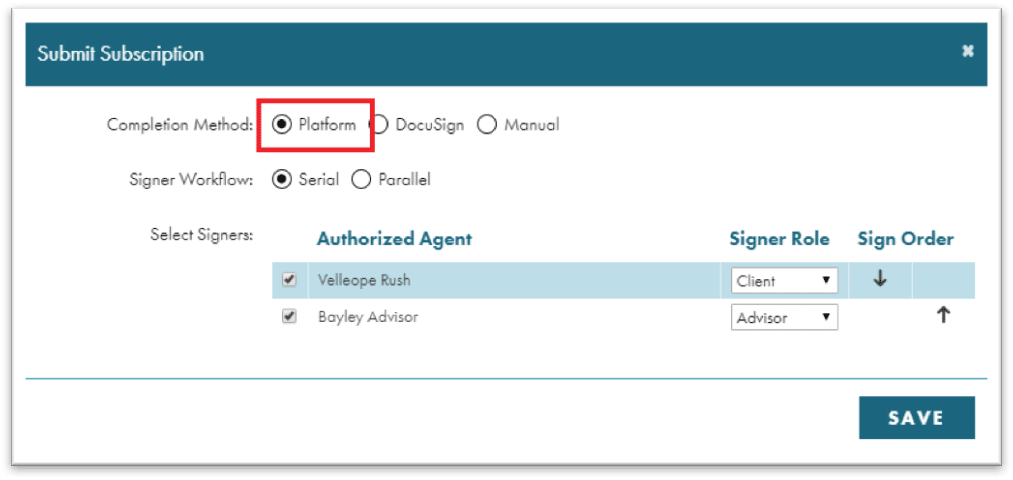
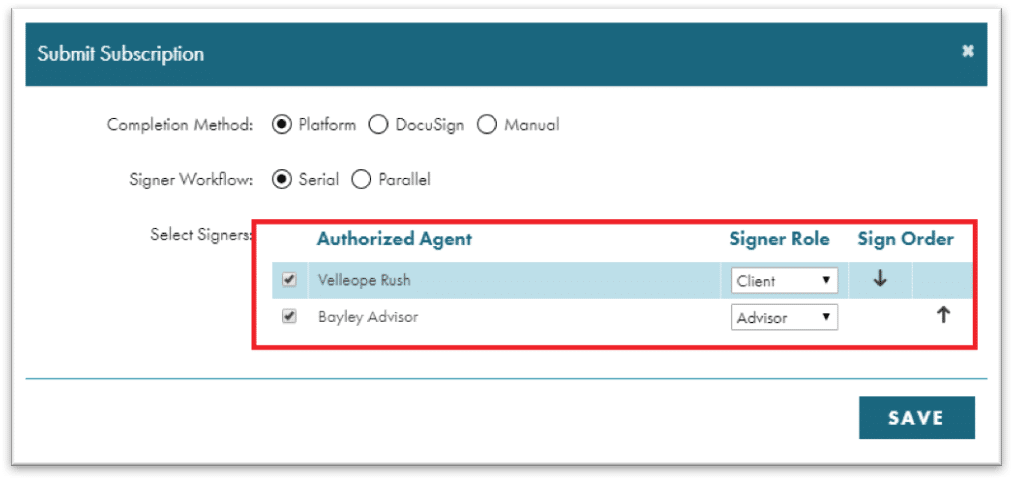
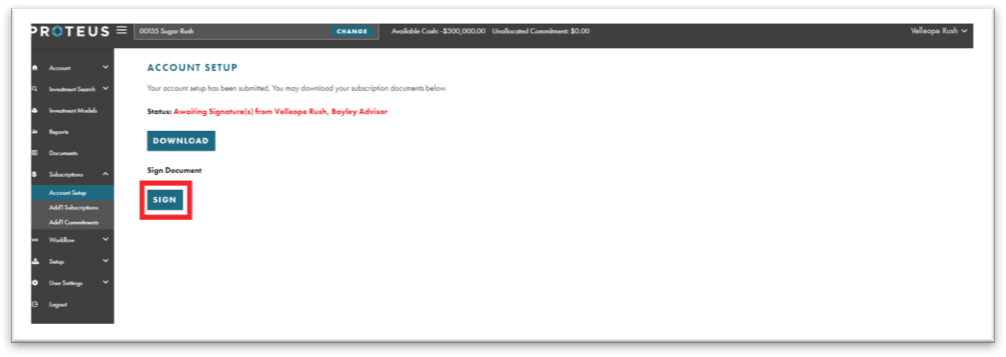
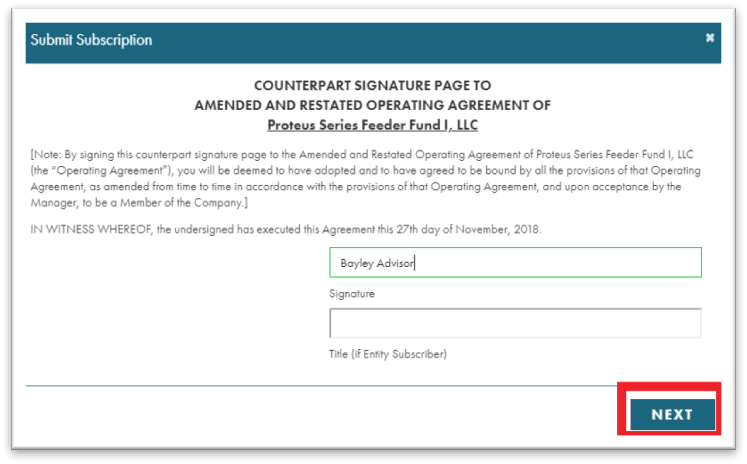
Step 34: Double check all the entered information. Once satisfied, the subscription package is ready for submission. Continue with [need title] for instructions on how to submit the subscription package.

Return to Menu

SECTION 3

MAKING INVESTMENTS

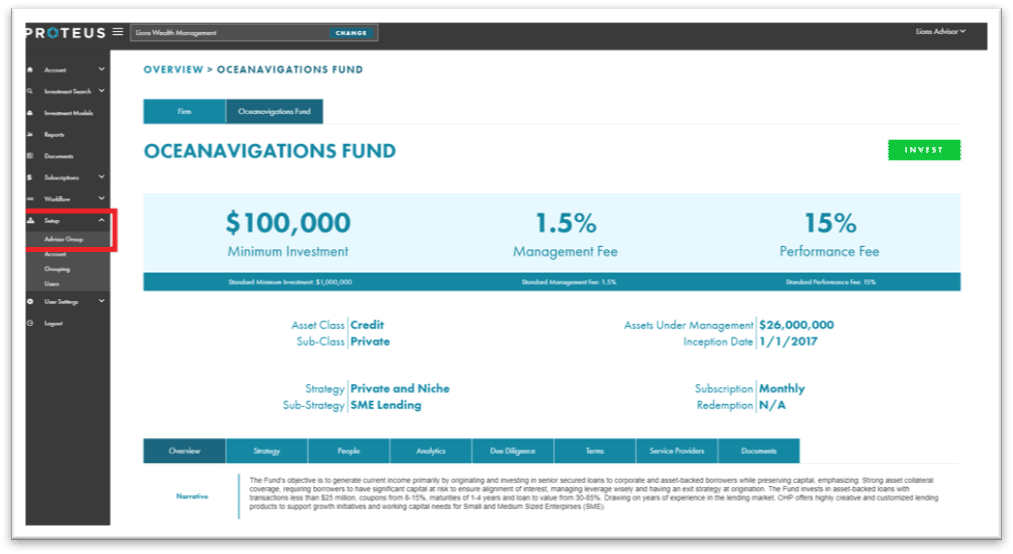
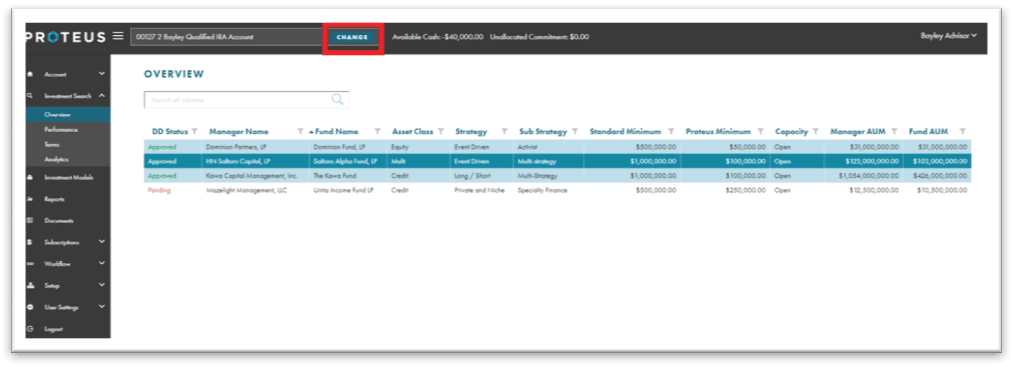
Once the account has been funded via the subscription process in Section 2, investments can be selected via the Investment Search functionality within the platform, or by using a user- or admin-created investment model. 

3.1: INVEST USING A MODEL

Custom investment models may be created by different users, advisors and administrators to streamline the investment process and performance tracking of specific funds. The following steps will detail how to invest in models within the platform. 

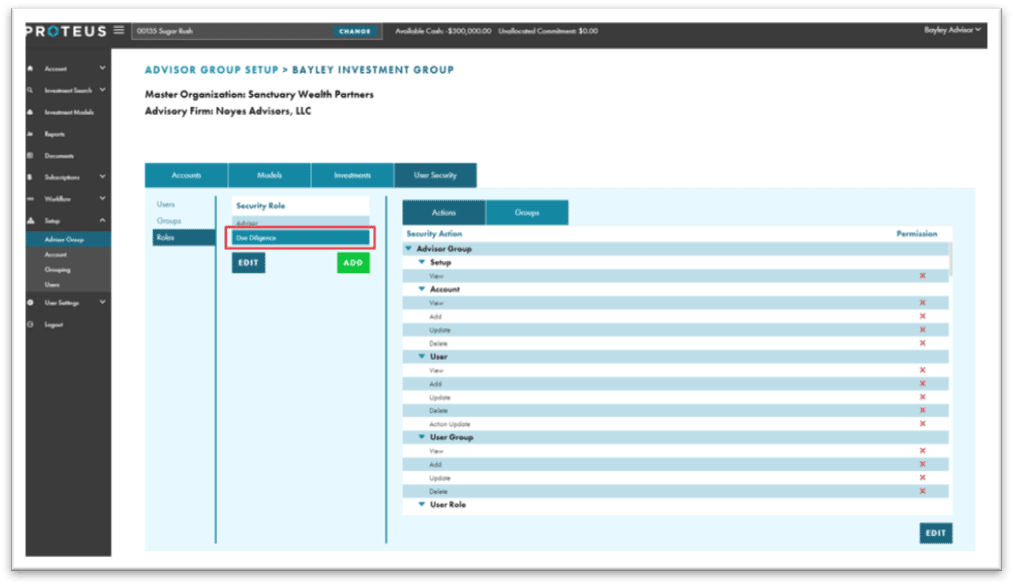
Note: These steps are a supplement to step 1 of 1.2 Grant Investment Access (User Accounts)
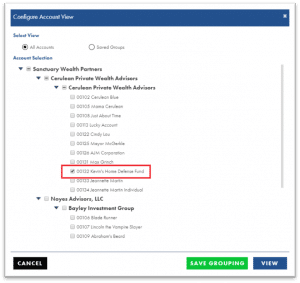
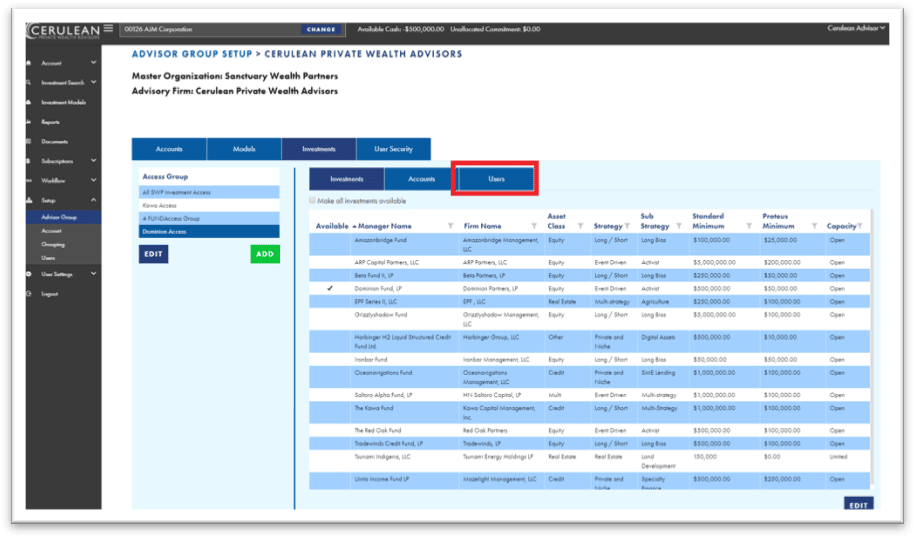
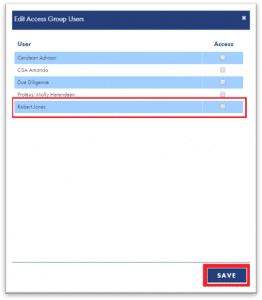
Return to Menu

Step 1: In the “Add Account” process on the “ Investments” tab, choose Model.

Return to Menu

Step 2: Enter the contribution amount.

Return to Menu

Step 3: Select the appropriate model from the drop-down list. Enter the percentage allocation and click ADD.

Return to Menu

Step 4: Repeat the previous step, if necessary.  Once done, click “SAVE.”

Continue the add account process with Step 1 of 1.2 Create New Account – New User Process above. 

Return to Menu

SECTION 4

COMPLIANCE OPERATIONS

This section details the proper method of submitting subscription agreements to Sanctuary Wealth Partners’ compliance team. 

4.1: SWP COMPLIANCE PROCESS

Return to Menu

Step 1: Compliance receives an email stating a Proteus Subscription Agreement has been submitted.

Review the subscription agreement attached to the email or access the agreement within Proteus.

Return to Menu

Step 2: Login as SWP Compliance user (swpcompliance).

Return to Menu

Step 3: Change the view to the account listed in the email. Click “CHANGE.”

Return to Menu

Step 4: De-select any previously selected accounts.

Return to Menu

Step 5: Select the correct account. Click “VIEW.”*

*From here you can view the account information. Under “Investment Search,” the investments to which the investor has access can also be reviewed.

Return to Menu

Step 6: Under “Documents,” the executed subscription agreement can be found.

Return to Menu

Step 7: Once satisfied with the information and ready to approve, go to “Workflow” and select “Workflow Processes.”

Return to Menu

Step 8: Select the appropriate account from the list.

Return to Menu

Step 9: Click the arrow next to “Compliance Review” and select the “Compliance Review” task.

Return to Menu

Step 10: Enter the investor name, the reviewer name, the date and any notes.

Return to Menu

Step 11: Once ready to approve, check the Mark Task Complete box and click “SAVE & NEXT.”

Return to Menu

Step 12: The tasks will show as complete and a notification will be sent to Proteus stating Compliance has approved the account.

Return to Menu

SECTION 5

DUE DILIGENCE OPERATIONS

This section details the proper method of creating non-investing due diligence users and security groups for your organization. 

5.1: CREATING A DUE DILIGENCE USER

Return to Menu

Step 1: Log in to the Proteus Platform.  

Visit https://platform.proteuscapital.us/ or use your organization’s custom URL and enter your user credentials to log in as an advisor or CSA. 

Return to Menu

Step 2: Go to Setup, then click “Advisor Group” 

Select the appropriate advisor group from the list and click on “User Security.”

Return to Menu

Step 3: Click “ADD” under “Users” to begin adding a new a user.

Return to Menu

Step 4Select the “New” radio button to designate a new user.

Enter the user name, login, and email for the user. Click “SAVE” to continue.

Return to Menu

Step 5: The user is now created and can be accessed from the user list.

Return to Menu

Step 6 Select user and select “Edit” under “Groups”

Return to Menu

Step 7: Check the Due Diligence security group and click “SAVE.” 

(See 6.1…. for instructions on creating the security group if it does not exist.)

Return to Menu

Step 8Select the “Investments” tab.

Return to Menu

Step 9: Create a new Investment Access Group, if one does not exist, by clicking “ADD.”

Return to Menu

Step 10Enter the name for the Investment Access Group, a description and click “SAVE.”

Return to Menu

Step 11: Select the new access group.

Return to Menu

Step 12Choose the investment(s) to add to the group and then click “EDIT.”

Return to Menu

Step 13: Check the appropriate investment(s) and click “SAVE.”

Now the investment(s) are included in the investment access group. Next, we will connect the user with the investment access group. 

Return to Menu

Step 14Select the “Users” tab.

Return to Menu

Step 14: Click “EDIT.”

Return to Menu

Step 15 Select the user(s) you want to associate with this access group, then click “SAVE.”
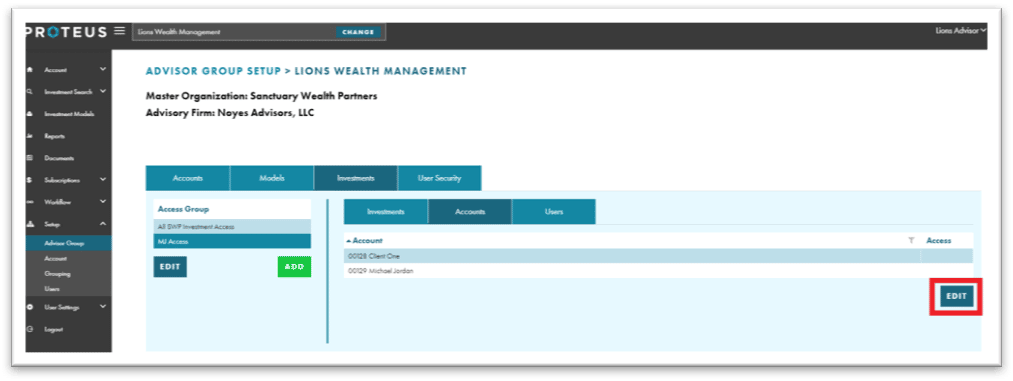
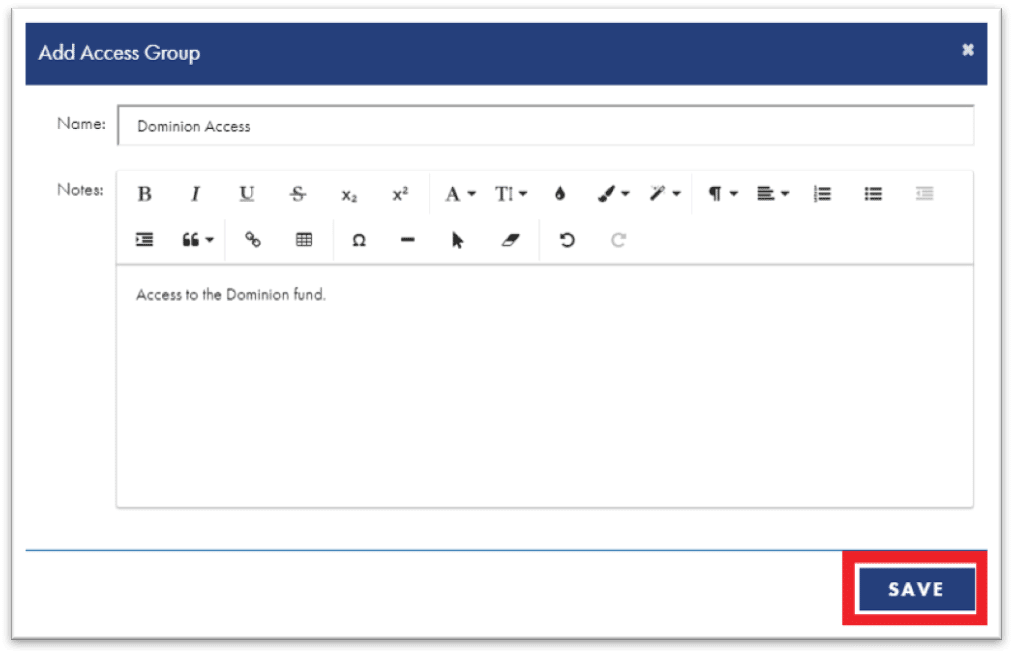
In this example: The user, Robert Jones, now has access to the Dominion Access investment group. When Robert logs in, he will see only the Dominion fund in the investment search.

Return to Menu

5.2: CREATE A DUE DILIGENCE SECURITY GROUP*

*Follow these instructions if the Due Diligence Group and Role do not exist. 

Return to Menu

Step 1: Go to “Setup”, “Advisor Group”, *Your Advisor Group*, “User Security” and select “Roles.”

Return to Menu

Step 2Select “ADD.”

Return to Menu

Step 3: 1. Enter the name of the group and select “SAVE.”

Return to Menu

Step 4Select the new role to assign security actions.

Return to Menu

Step 5: Click “EDIT” under Actions.

Return to Menu

Step 6Select the appropriate security actions. For a Due Diligence user, only allow access to Investment Search. Click “SAVE.”

Return to Menu

Step 7: Select “Groups.”

Return to Menu

Step 8Select “ADD.”

Return to Menu

Step 9: Enter the name of the group and click “SAVE.”

Return to Menu

Step 10Select the new Group to associate the Due Diligence role.

Return to Menu

Step 11: Select the “Roles” tab.

Return to Menu

Step 12Select “EDIT.”

Return to Menu

Step 13: Select the appropriate Security Role. In this case, Due Diligence. Click “SAVE” when finished.
The Security Group is now created and ready for use.

Return to Menu

SECTION 6

SUBMITTING THE SUBSCRIPTION PACKAGE

This section details the three methods for submitting the subscription agreement to Proteus once all operations have been completed. 

6.1: SUBMIT THE SUBSCRIPTION PACKAGE – MANUAL SIGNATURES

Return to Menu

Step 1: Log in to the Proteus Platform as an Advisor or CSA

Return to Menu

Step 2: Review the subscription information to ensure its accuracy. Once the information is verified, click “SUBMIT.”

Return to Menu

Step 3: Choose the method for obtaining signatures.

Return to Menu

Step 4: Choose “Manual” and click “SAVE.”

Return to Menu

Step 5: Click “DOWNLOAD” to save a copy of the document.

Return to Menu

Step 6: Open and print the document.

Return to Menu

Step 7: View the account and navigate to “Subscriptions,” and then “Account Setup.” Select “UPLOAD.”

Return to Menu

Step 8: Navigate to and select the correct document. Click “Open.”

Return to Menu

Step 9: The signed document has been uploaded. The subscription package will now be reviewed by SWP compliance and Proteus.

Return to Menu

Step 10: The signed document can also be seen under “Documents,” under “Executed Subscription Agreement.”


Return to Menu

6.2: SUBMIT THE SUBSCRIPTION PACKAGE – DOCUSIGN

Return to Menu

Step 1: Follow Steps 1-3 from the previous module: 6.1: Submit the Subscription Package – Manual Signatures

Return to Menu

Step 2: Select “DocuSign.”

Return to Menu

Step 3: Determine the correct signer workflow.

Return to Menu

Step 4: Select the signers and the order to sign (if serial/series is chosen).


Return to Menu

Step 5: Follow the instructions from DocuSign. Once complete, the following message is displayed.

Return to Menu

Step 6: View the email and select “REVIEW DOCUMENT.”

Return to Menu

Step 7: 1. Follow the instructions from DocuSign. Once complete, the following message is displayed.

Return to Menu

6.3: SUBMIT THE SUBSCRIPTION PACKAGE – PLATFORM

Return to Menu

Step 1: Follow Steps 1-3 from the previous module: 6.1: Submit the Subscription Package – Manual Signatures

Return to Menu

Step 2: Select “Platform.”

Return to Menu

Step 3: Determine the correct signer workflow.

Return to Menu

Step 4: Select the signers and the order to sign (if serial/series is chosen).


Return to Menu

Step 5: Login as the Investor.

Return to Menu

Step 6: Review the statement and enter name and title (if necessary).Click “NEXT.”

Return to Menu

Step 7: Review the second signature statement and enter name and title (if necessary). Click “SAVE.”

Return to Menu

Step 8: Login as the advisor.

Return to Menu

Step 9: Enter name and title (if necessary). Click “NEXT.”

Return to Menu

Step 10: Enter name and title (if necessary). Click “SAVE.”

Return to Menu

SECTION 7

ADDITIONAL ASSISTANCE

For additional assistance with the setup and use of your account, send an email to IR@proteuscapital.us or call us at 1-317-653-2756 and a member of our team will contact you shortly.

Return to Top